|
Canon EOS 7D Mark II Photography
This clearly written and easy-to understand short course on your Canon 7D Mark II, explains step-by-step why, when and how you use your camera’s controls for better pictures. This heavily illustrated 281 page guide is available as a full-color, fully searchable PDF eBook you can order on a CD or download instantly. The eBookis readable on almost any device and you are welcome to print a copy for personal use.
Introducing Animations
This eBook has links to 50 animations, movies and other resources that illustrate and explain the core concepts of digital photography. Integrated throughout the eBook, these linked resources help you understand your camera better, and make you a better photographer.
To use the animations you need an Internet connection. To preview them visit www.shortcourses.com/hot/hot1-3.html.

Click to see how every camera is just a black box then minimize or close the animation window.
Click to see how full color images are created from only three colors then minimize or close the animation window.
Introduction
New, a Short Courses digital photography book for people who want to get better pictures with their Canon EOS 7D digital SLR camera. This beautifully written and illustrated guide, pulls together answers to the questions you might have about using the camera, including the following:
Contents
Preface ...2
The Luddite’s Guide to Digital Photography ...5
Classic Photography—The Shortest of Courses ...6
The Creative Technique Finder ...12
Chapter 1
Getting to Know Your Camera...14
Topic 11. In the Beginning ...15
Topic 12. What is a Digital Photograph? ...19
Topic 13. The Canon 7D Mark II CameraIntroduction ...21
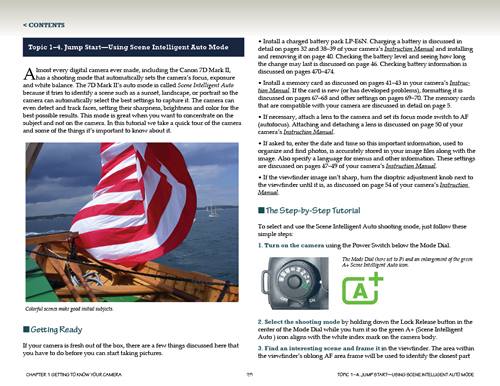
Topic 14. Jump StartUsing Scene Intelligent Auto Mode ...25
Topic 15. Good Things to Know ...29
Topic 16. When Things Go Wrong ...31
Topic 17. Anatomy of the Camera ...33
Topic 18. Using Menu Settings ...37
Topic 19. The Quick Control & Function Setting Screens ...39
Topic 110. Using the Cameras Displays ...41
Topic 111. Live View ...44
Topic 112. Changing Drive Modes ...48
Topic 113. Playing Back & Managing Your Images ...51
Topic 114. Caring for Your Camera ...53
Topic 115. Projects in Photography ...57
Chapter 2
Choosing Your "Film" ...70
Topic 21. Pixels and Colors ...71
Topic 22. Changing Image Quality ...75
Topic 23. Image Sizes & Aspect Ratios ...81
Topic 24. ISO Sensitivity ...84
Topic 25. Noise Reduction ...87
Topic 26. White Balance ...89
Topic 27. Setting and Using a Custom White Balance ...93
Topic 28. Selecting a Color Space ...95
Topic 29. Projects in Photography ...97
Chapter 3
Setting the Shutter Speed and Aperture ...109
Topic 31. Shutter Speed & ApertureIntroduction ...110
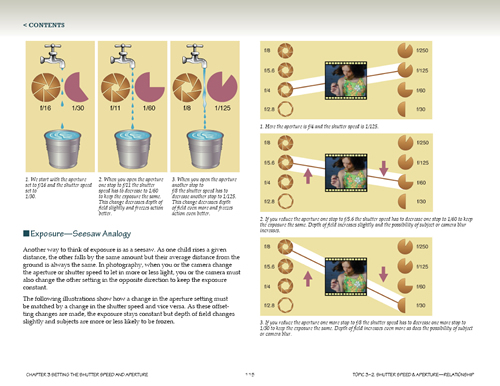
Topic 32. Shutter Speed & ApertureRelationship ...114
Topic 33. Shooting ModesIntroduction ...118
Topic 34. Shooting ModesProgram AE (P) ...120
Topic 35. Shooting ModesShutter-Priority (Tv) ...122
Topic 36. Shooting ModesAperture-Priority (Av) ...128
Topic 37. Shooting ModesManual (M) ...132
Topic 38. Shooting ModesBlub (B) ...134
Topic 39. Shooting ModesCustom (C1C3) ...135
Topic 310. Shutter SpeedSharpness ...136
Topic 311. Shutter SpeedCamera Movement Blur ...139
Topic 312. Shutter SpeedSubject Motion Blur ...141
Topic 313. ApertureUnderstanding Depth of Field ...145
Topic 314. ApertureCircles of Confusion ...151
Topic 315. ApertureShallow Depth of Field ...154
Topic 316. ExposureUsing Histograms ...158
Topic 317. ExposureYour Exposure System ...164
Topic 318. ExposureMetering Methods ...167
Topic 319. ExposureWhen Automatic Works Well ...169
Topic 320. ExposureWhen to Override Automatic ...171
Topic 321. ExposureHow Overriding Auto Works ...176
Topic 322. ExposureCompensation ...178
Topic 323. ExposureLocking (AE Lock) ...181
Topic 324. ExposureBracketing (AEB) ...185
Topic 325. ExposurePlacing a Value ...187
Topic 326. ExposureUsing a Gray Card ...189
Topic 327. ExposureControlling Tones In Your Images ...191
Topic 328. Projects in Photography ...193
Chapter 4
Focusing & Sharpness ...206
Topic 41. The Plane of Critical Focus ...207
Topic 42. Manual Focus ...209
Topic 43. Hyperfocal Distance and Zone Focusing ...212
Topic 44. Autofocus...215
Topic 45. Selecting Autofocus Areas & Points...220
Topic 46. Focus Lock & Back Button Focus ...224
Topic 47. Projects in Photography ...227
Chapter 5
Changing Lens Focal Lengths ...234
Topic 51. Lenses ...235
Topic 52. Focal Length ...241
Topic 53. Zoom Lenses ...245
Topic 54. Normal/Standard Focal Lengths ...247
Topic 55. Short Focal Lengths ...250
Topic 56. Long Focal Lengths ...255
Topic 57. Perspective in a Photo ...263
Topic 58. Close-up Photography ...265
Topic 59. Tilt-Shift Lenses ...271
Topic 510. Lens Accessories ...274
Topic 511. Projects in Photography ...277
Preface
Digital photography has had a wonderful impact on photography, however, it also has a downside. Since features can be added digitally at very little cost, there is a tendency among camera designers throughout the industry to add almost any feature they think may be of use to someone, somewhere. In the days of mechanical film cameras adding features was expensive, so most cameras had only the most basic—those that directly affected the content and quality of your images. On these classic cameras there were basically five things you could change; the film’s type and speed (ISO), the camera’s aperture, shutter speed and focus, and the focal length of the lens. There was very little to learn about the camera itself. For example, the User Guide for the Leica M4, introduced in 1967, was 31 pages long. The 7D Mark II has a 147 page Basic Instruction Manual and a 546 page Instruction Manual. All of this material is needed to describe 122 menu settings with hundreds of choices (See the Instruction Manual, pages 484–494) along with 30 plus buttons and dials. There are more than 44 pages just on playing back your images! Feature creep has turned into a feature avalanche.
This book cuts through the clutter to focus on just those aspects of your camera that affect the content and quality of your images. It focuses on five things: how the image sensor affects the capture of light and color, how the aperture and shutter speed affect the capture of depth and motion in a photo, how focus determines the sharpest part of the image, and how the lens determines what’s in the picture and what isn’t. If you master just these five classic techniques, and the ways they interact to influence your photos, you will be a very good photographer.
Among the things that make this book unique are the many integrated learning activities such as animations and See for Yourself sections that bring learning to life. With its many active links and guided visits to the Internet, it works best as an eBook. However, if you are one of those still committed to the printed page you can print out each section as you study it or have a company such as Staples or Kinkos print a personal copy.
The book opens with two unique sections:
- Classic PhotographyThe Shortest of Courses introduces you step by step to the five techniques that are central to creative photography and the focus of this book.
- The Creative Technique Finder lists most of the things you might want to do in photography and lists the techniques you would use to achieve them.
Topic Sections
This book is organized into chapters containing closely related and easy to understand numbered topics, each of which can be studied in any order and most of which have the following sections:
- An introduction discusses the photographic concept or camera technique that is the focus of the topic. This discussion is an overview that provides the context and foundation for understanding your own camera.
- Tips discuss things that fall outside of the main narrative but which are interesting or important to know. Since so many concepts of photography are interrelated, tips also cross link concepts by referring you to related topics. Cross references in these sections direct you to sections in your cameras Instruction Manual where topics beyond the scope of this book are discussed in detail. The cross referenced topics are generally mechanical aspects of the camera that are not directly related to capturing fine images.
- Resources to Explore provides links to animations, movies, PDFs and Web sites that relate to the current topic. Especially important are the guided references to finding information on the Internet. Learning how to do so will serve you well going forward as you continue to explore photography on your own.
- Keystroke boxes like the example that follows on Making Menu Choices, are found throughout the book and give you instructions on how to perform the task being discussed step-by-step.
If, while reading these topics, you encounter a photographic term or phrase with which you arent familiar, search this eBook, the cameras Instruction Manual and the Internet to learn more about it.
MAKING MENU CHOICES
- To display the last menu you viewed, press the MENU button.
- To scroll through main and secondary tabs turn the Main Dial.
- To select a setting listed on the menu (not all commands list settings), turn the Quick Control Dial to highlight it, then press SET. The current setting is indicated in blue.
- To backup without changing a setting, press MENU or the shutter button before pressing SET.
- To exit the menu, or in some cases back up through previous choices, press the MENU button. To exit without making a change press MENU before pressing SET.
- To instantly return to shooting, press the shutter button halfway down.
- To display a description of the highlighted menu setting, hold down the INFO button.
- Seeing for Yourself includes demonstrations of the concept under discussion and guides you from passively reading to actually using your own camera to actually see the effects you can get when you change settings. Getting better at photography requires practice and thats one of the things this section is designed to help you with by making it more convenient. In some topics it does this by displaying "targets" which are discussed below.
- Projects at the end of each chapter pull together the concepts discussed in the chapter. Many of the projects are based on themes inspired by the images, techniques and teachings of great photographers such as Diane Arbus, Dorothea Lange, Garry Winnogrand, Ansel Adams, Eugene Atget, Walker Evans and many others. The discussion of these historic figures will hopefully encourage you to learn more about them, their work and the history and aesthetics of photography as a fine art.
Using Your e-Reader
This book is in a PDF format that can be displayed on almost any computer, smart phone or tablet and the book automatically scales to fit the devices screen. You can transfer the eBook to any of these devices using an app such as Dropbox. Once there, you can then use a menu to open the book in Kno, Adobe Reader, iBooks, Kindle, Evernote and other apps on your device. Each of these apps has its own unique features so refer to their documentation if you are not familiar with them. The things you want to know include how to use your app to open PDF documents, display single pages, scroll back and forth through pages, click or tap links, print copies, and add notes.
A Word about Targets
Many of the Seeing for Yourself sections, and a few of the projects at the end of chapters, refer you to targets in Appendix A. A target is simply a photo or other illustration that you display on your e-reader to explore the concepts and techniques of photography using your own camera. For example, you can photograph a ball bouncing on the screen to see the effects of shutter speed on motion capture and focus tracking. Although just rough approximations of the real world, targets have certain advantages:
- They save you time because you dont have to find real-world scenes where you can practice procedures.
- You can use targets anywhere, anytime, even at night. You are not dependent on the quality of the light and weather.
- Targets are less complex than real-world scenes so the effects stand out more clearly.
- Targets are uniform so you can easily compare your results with and ask questions of others using the same targets.

This target is used to practice face detect and shows (front row left to right) Harry A. Longabaugh, alias the Sundance Kid, Ben Kilpatrick, alias the Tall Texan, Robert Leroy Parker, alias Butch Cassidy; Standing: Will Carver & Harvey Logan, alias Kid Curry; Fort Worth, Texas, 1900. From the studio of John Schwartz.
CLICK TO DOWNLOAD TARGETS
|